![]() Double click on the OBLIGE icon (shown right) to run it.
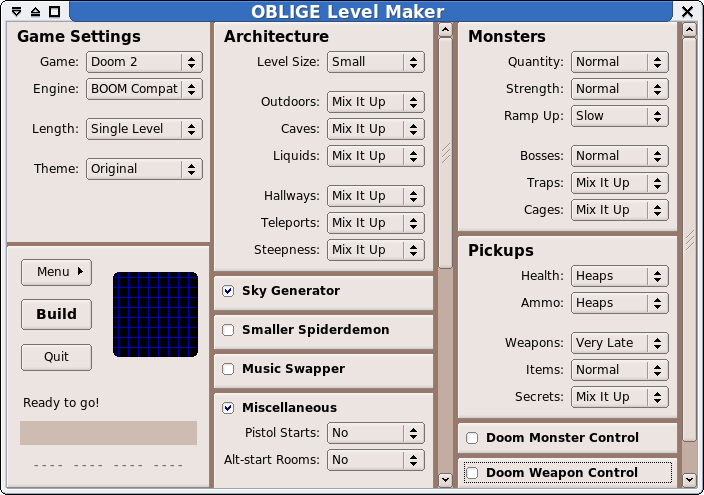
Select the target game in the top left panel,
and change any settings which take your fancy.
Then click the button
in the bottom left panel,
and enter an output filename, for example "TEST"
(without the quotes).
Double click on the OBLIGE icon (shown right) to run it.
Select the target game in the top left panel,
and change any settings which take your fancy.
Then click the button
in the bottom left panel,
and enter an output filename, for example "TEST"
(without the quotes).
OBLIGE will then build all the maps, showing a small blueprint of each one as it goes, and if everything goes smoothly the output file, for example "TEST.WAD", will have been created. Then you can play it using the normal method for playing mods with that game, e.g. modern DOOM source ports allow you drag-and-drop the WAD file onto the EXE to play it.

The top left panel contains the most important settings.
These settings include the to build for (currently limited to the DOOM family of games), and the of the output wad (SINGLE-LEVEL, ONE-EPISODE, FULL-GAME).
The button has several normal themes and also some special settings. The "Jumbled" setting means each map's theme is chosen purely randomly (and usually different from the last), where "A Bit Mixed" means groups of 2-4 maps have the same theme before choosing a new one. The "Original" setting causes the themes in each episode to try and match the original game, where the "xxx-ish" settings mean you get mostly "xxx" but with a different theme thrown in occasionally.
Choosing "Mix It Up" as a setting means that each map will get different values, chosen at random. For example, using it with the button causes the maps to be a mixture of small, regular and large.
The button determines the overall toughness of the monsters. The "Normal" setting is designed to give a mix of monsters similar to the levels in the original game. Compared to that, the "Weak" setting produces weaker monsters and the "Tough" setting gives tougher ones. Note that the toughness increases over the course of an episode or game, it starts off quite weak and ramps up to the chosen setting by the end. How fast this ramping up occurs can be controlled by the button.
The "Crazy" strength setting works a bit differently. It forgets all about trying to make battles which are fair, and throws any or all of the monsters at you, including bosses! Be warned though, playing maps on this setting can actually drive you insane.
Modules are enabled or disabled by the check-box next to the module's name. Modules must be both enabled and visible in order to have any effect, otherwise they do nothing. When a module has options, those options are hidden while the module is disabled.
Modules can depend on a certain game, or a certain engine (source port), or even on another module. When a module is not usable with the current settings, it stays hidden. For example, a module which requires ZDoom will not be visible until ZDoom is chosen for the button. Changing the current game or the current engine can cause some modules to appear and/or other modules to disappear.
The levels created by OBLIGE are ready to play. There is no need to run the output WAD file through a node builder, since OBLIGE includes a built-in version of glBSP.
Note that settings in the Options and Addon windows typically require OBLIGE to be restarted before they take effect. Changes to add-ons mean that all the Lua scripts that OBLIGE has loaded are now invalidated, hence OBLIGE must be shut down and restarted.
Here is a simple example:
The "--batch" option is essential, and it must be followed by the output filename. There are other options which begin with "--", for example "--verbose" causes lots of messages to be displayed in your terminal window.
Options of the form "name=keyword" are used to set OBLIGE settings. Note that there must not be any spaces around the "=" sign. Running OBLIGE normally and using the Config Manager (F9 key) is a good way to get familiar for what settings are available, and which keywords they require.
When you want to control many settings, there is a better way than simply adding lots of arguments to the command line. Instead you can use the Config Manager to save your desired settings into a file, such as "MYCONF.txt", and use the "--load" option to load those settings in batch mode. For example:
Most games let you play at different skill levels, for example: Hurt-Me-Plenty vs Ultra-Violence, and OBLIGE takes them into account. Easier skill levels will have less monsters than harder skill levels, while health and ammo remain the same.
You need to use a Source Port to play the levels, because the original DOS versions, such as DOOM.EXE and DOOM2.EXE, cannot cope with the architecture which OBLIGE creates. For example, you will probably get the "Visplane Overflow" error which quits the game, or a crash when saving to a savegame. Note that Chocolate-Doom has the same limitations as the original DOS versions, and hence cannot be used either.